Short answer: Install a wall-mounted umbrella by fixing its top bracket and lower catch bracket into solid structure, never into cladding: screws into timber studs or posts, expansion bolts into concrete, using the maker's fixing schedule. Shadowspec recommends the top of the Retreat's wall bracket sit 2,205 mm above the ground. The wall, not the umbrella, is the real question.
If your wall is solid concrete or sound timber studs, the steps below take a wall-mounted umbrella from bracket to shade. If it is brick, a pillar or something nobody is sure about, read the next two sections first.
Is your wall strong enough for a wall-mounted umbrella?
Only a builder can confirm it, but the principle is simple to describe. Wall-mounted umbrellas hold their canopy out on an extended arm, so wind pushing against the fabric acts as a lever on the fixings. The weight of the umbrella itself is rarely the problem; the pull on the top bracket during a gust is.
Shadowspec's installation guide for the Retreat opens with that condition: choose a wall, pillar or post strong enough to mount the Retreat. Its New Zealand site adds that posts and pillars are suitable only when they are solid and anchored at the base, recommending that owners consult a builder or structural engineer whenever there is any doubt.
Owners arrive at the same conclusion from the opposite direction. On the Bunnings Workshop forum in October 2025, a homeowner who had wall-mounted thousands of household items asked about fixing a 3 m umbrella to a brick pillar; the team member who replied explained that such pillars may not have been designed to carry additional sideways loads such as an umbrella. The reply recommended engaging a structural engineer or qualified builder before drilling anything.
How do you fix a wall umbrella to a timber stud wall?
Into the studs, not the cladding. Shadowspec is plain about this: on a wooden wall the bracket must be fixed into the studs behind the wall surface, because cladding alone will not hold and the bracket may loosen over time.
For timber, the Retreat's instructions specify three #14/18 x 75 mm hex flange screws for the top wall bracket, with the identical schedule for a post. Every fastener should be 316 stainless steel, chosen to suit the structure; none are included in the box, so purchase them before installation day.
Compare whatever hardware does arrive in the box with your particular wall. A Bunnings Workshop member found in December 2024 that the fixings supplied with an umbrella were meant for masonry, not the treated pine post they planned to use. The reply there also pointed out that wind puts lateral forces on a structure it was never designed for.
How do you fix a wall umbrella to brick or concrete?
Concrete is the easy case; brick needs a closer look. For concrete, the same instructions specify three 8 mm expansion bolts for the top bracket; for the bottom catch bracket they list two 6 mm expansion bolts or two #12 x 50 mm flange screws. Shadowspec describes concrete walls as the most secure fixing point available.
Brick is not listed in that schedule, which is precisely where owners get stuck. One asked on DIY Stack Exchange in April 2022 what to do when the bracket's holes landed on a mortar joint or the edge of a brick; the replies advised avoiding both positions, while one suggested contacting the manufacturer.
The fixing maker's answer for hollow brick is a chemical anchor. Ramset says its hollow brick and block sleeves are used with ChemSet 101 and UltraFix Plus to anchor threaded studs, forming a solid plug of adhesive in the brick's cavity with no expansion stress on the brick. Nylon sleeves suit 3-hole brick, while fine metal mesh sleeves suit 10-hole brick. Whether that suits your particular wall is the question to put to a builder, particularly if the brick is a single skin in front of timber studs.
The fixing picture for the Retreat, wall by wall, looks like this.
| Wall type |
Top wall bracket, per Shadowspec |
What to confirm first |
| Timber stud wall |
#14/18 x 75 mm hex flange screw, qty 3, into studs |
Stud positions; cladding alone will not hold |
| Timber post |
#14/18 x 75 mm hex flange screw, qty 3 |
The post is solid and anchored at the base |
| Concrete |
8 mm expansion bolt, qty 3 |
The wall is solid concrete throughout |
| Brick |
Not listed in the schedule |
Brick type, the right anchor and a builder's view |
What height should a wall-mounted umbrella go?
For the Shadowspec Retreat, 2,205 mm from the ground to the top of the top wall bracket. That mounting height comes from the printed instructions supplied with the umbrella. Shadowspec's own New Zealand article gives 2,175 mm, so follow the printed instructions and confirm with us before drilling if the difference matters on your wall.
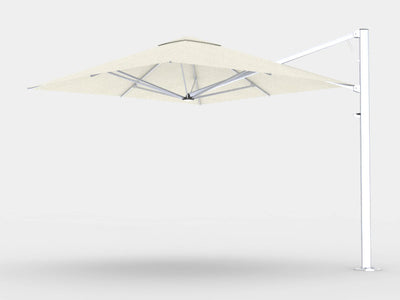
At that height, the Retreat product page puts the canopy edge 2,166 mm above the ground, reaching 2,609 mm out from the wall, or 3,065 mm with its extension, which sets how much of the patio below it will shade. Height matters on a lower wall as well: a Bunnings team member noted in January 2025 that the wall-mounted umbrella Bunnings stocks sits directly in line with its bracket. The same reply suspected a 150 cm pool fence would therefore be too low.
Step by step: installing the Shadowspec Retreat
The sequence below follows Shadowspec's printed instructions and its New Zealand article. Tools: a set square, tape measure, spirit level, electric drill, screwdriver, ratchet and eye protection.
- Choose a wall, pillar or post strong enough for the umbrella, then buy 316 stainless fasteners to suit it.
- Using the top wall bracket as a template, mark the holes at the recommended mounting height and confirm them with a spirit level.
- Fix the top wall bracket, then the bottom catch bracket below it, then slide the spring cup into the top bracket and finger-tighten its screw.
- Lower the arm into the top wall bracket and fully tighten the shoulder fixing bolts.
- Engage the gas spring and lock the C-clip; the spring is now under pressure, so fit the canopy frame straight away.
- Fit the fabric, then open the umbrella and confirm that both brackets stay firm with no movement under load.
Once it is up, closing the umbrella before the wind builds is part of the job. Shadowspec rates its umbrellas to Beaufort 5, or 29 to 38 km/h; beyond that, fold the Retreat back against the wall and fit its cover.
What about balconies and strata?
Approval first, drilling second. Shadowspec notes that a wall mount avoids piercing the waterproof membranes on rooftops and balconies, which is one reason it suits apartments and small outdoor areas. In a strata building the wall may be common property, so check the by-laws and get written approval before any fixing. Our article on the best umbrella for a small balcony covers the strata rules in detail.
When should you not wall-mount an umbrella?
When nobody can identify what the wall is made of, or a builder advises against it. The honest alternatives are an independent post on its own footing, which the Workshop community suggested for the brick pillar above, or a cantilever anchored into the ground, which puts shade over the same outdoor space without touching the wall.
Ring me on 1300 515 620 with a photo of the wall before you buy. If it will not carry a Shadowspec Retreat, I will say so. Shadowspec also works directly with your installer to provide support at the time of install.
Every umbrella we sell comes with our price-beat promise: find a genuine like-for-like price elsewhere and we will beat it. Delivery is priced by state and shown before you pay. We check the fit before you order, see the delivery through, ring within a week and handle any warranty claim with Shadowspec for you. Browse the wall-mounted umbrellas or the spare wall mount bracket kit for a second location.
You May Also Like:
About the author:
“I have a real passion for helping transform outdoor spaces so people can relax, connect and entertain with confidence and pride. With My Acre, I love guiding homeowners to create beautiful and functional outdoor living areas."